Creating your own leather sandals by hand is an excellent way to showcase your creativity and skills in crafting. Not only will you be able to create something unique, but it’s also an economical choice for those wanting to save money on footwear. With the right materials and tools, you can easily make a pair of stylish sandals that are sure to turn heads.
This guide will provide clear instructions for every step of crafting your own handmade leather sandals, allowing you to create stunning new footwear in a timely manner.
Making Sandal Patterns
To begin crafting leather sandals by hand, the initial step is to create a pattern. Sandal patterns can be made out of cardboard paper, or thin wood.
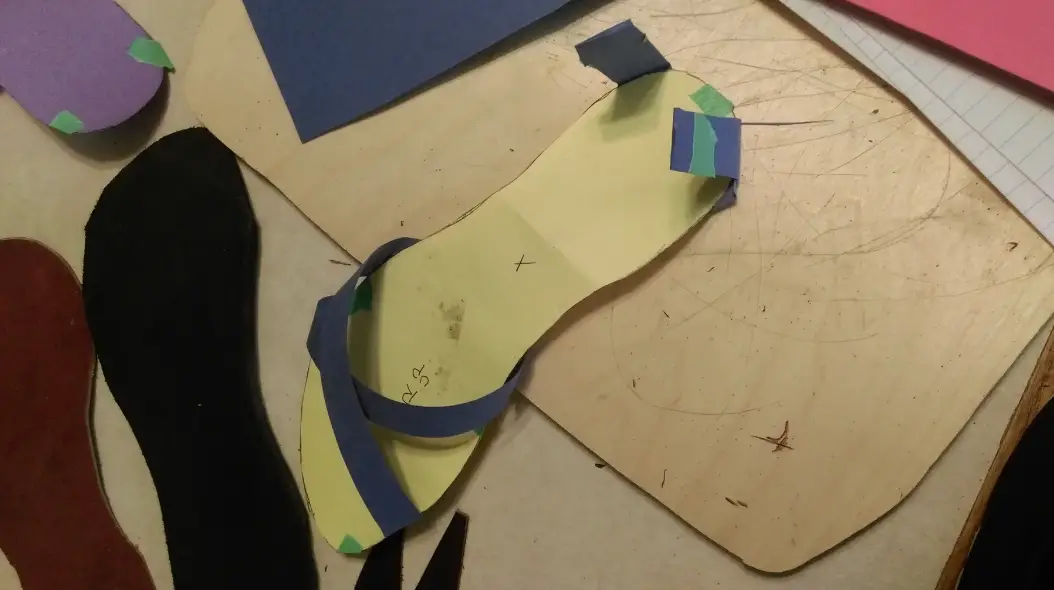
Once you have your material chosen, sketch out the different parts of the sandal that need to be cut and then use a ruler to draw precise lines.
Keep in mind the type of heel you’d like to have, whether it be a thick heel or a flat one. When finished, cut out the pattern with scissors.
Tools And Materials
To create leather sandals, you will require a number of essential tools and materials. To begin, you will require leather which you can purchase either from craft stores or online. It should be soft enough to shape easily but still strong enough for shoes or sandals. You might also want to buy a leather dye to personalize the color of your sandals. Other materials you’ll need include thread, scissors, a ruler, a pen or marker for tracing patterns, and some foam for cushioning.
Finally you’ll need at least, preferably two, large needles called awls) that are meant for leather work.
How To Make Your Own Sandals
Making sandals out of leather is a fun and creative project that yields great results. It can be done by anyone with basic manual skills and access to the necessary tools. With a few supplies, some patience, and a bit of creativity, you can make your own pair of beautiful handmade sandals in no time!

Preparing Patterns
To create handmade leather sandals, the initial step is to make a pattern. You can either manually complete this task or use computer-aided design software. Once the pattern is finished, it should be cut out of leather or canvas, depending on the desired end result. Once the material is cut out, the pieces should be marked with ink or chalk to indicate where they will need to be sewn together. [1]
Tracing And Cutting
Once you have your materials, tools and design ready, the first step is to trace out the pattern onto the leather. To do this, place the pattern on the leather and use a pencil or permanent marker to trace it. It’s important to be as accurate as possible here since any mistakes in tracing can affect the final product. Once the tracing is done, you can use a sharp utility knife to cut out the pattern. Be sure to cut slowly and carefully in order to minimize any mistakes here as well.
Draping And Marking
To proceed with making handmade leather sandals, the leather needs to be draped and marked. This is done by placing the leather on a flat surface, such as a workbench or table, and then using tailor’s chalk to draw a line along the outline of the foot, including any desired details such as straps or buckles. The tailor’s chalk should be sharp and bright to ensure accuracy when transferring the design onto the leather. Once the mark is made on one side of the leather, it needs to be flipped over and marked again so that both sides will match up once they are cut out.
Dots And Slots
Once the leather is cut and all the pieces are ready, it’s time to assemble them together. For this, a technique called Dots and Slots is used. In this method, small dots are punched or cut into the leather pieces at different points. These punched or cut holes form ‘dots’. Then, metal rivets, snaps or screws are inserted into the punched holes forming ‘slots’.
The slots of one piece are then connected to the dots of another, thus joining the two pieces securely. This technique helps in creating durable and strong sandals that won’t easily come apart.
Fitting
Now that you have gathered all the necessary materials, it’s time to begin. The first step is to measure your foot so you can make the sandal fit perfectly. Measure the width of your foot from the widest point, as well as the length from heel to toe. You will also want to measure the circumference of your ankle. This will ensure that your sandal fits snugly around your foot and won’t slip off. [2]
Outlining
Crafting leather sandals by hand demands both patience and skill. It is important to carefully plan out your project before beginning. Make sure that you have the tools and materials before beginning. You will need leather, a pattern, scissors or a knife, sandpaper, glue, dye and footwear buckles or laces.
Scratching And Gluing
After cutting out the sole, it’s time to scratch and glue the leather soles together. Using a sharp utility knife, score the edges of the sole to give them a more finished look. Making it easier for the glue to stick to the leather is another benefit that will result from doing this.
Apply contact adhesive to the leather’s edges and press them firmly together. Wait for the glue to fully dry before moving on to the next step.
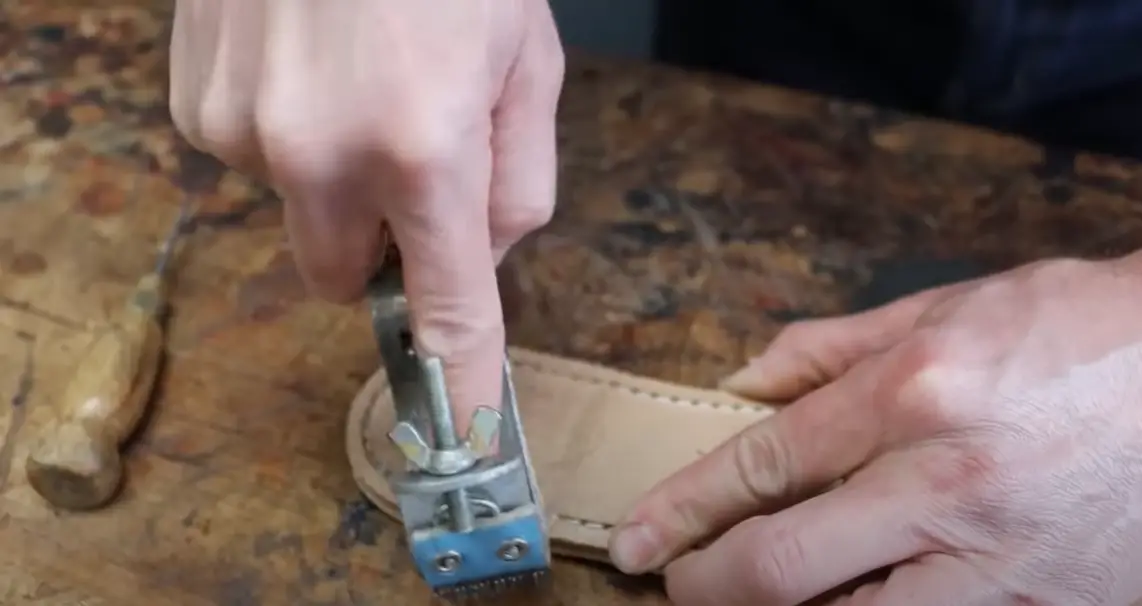
Skiving
Once you have cut out your pattern pieces from the leather, it’s time to skive them. Skiving is the process of shaving off a thin layer of the leather’s surface, allowing it to be folded over easily. This creates sleek edges and prevents any sharp edges from catching on clothing or the wearer’s feet. To skive your leather, you can use a scalpel to carefully shave the edges.
Alternatively, you can purchase a skiving machine to make the process easier and faster.
Preparing Rubber Soles
To begin making handmade leather sandals, the initial step is to prepare rubber soles. The best way to do this is to use a sheet of rubber between two pieces of scrap wood. Create a template for the soles and use an electric knife to cut them out. Once the soles are cut out, use sandpaper to smooth down the edges. [3]
Joining Rubber Soles
To complete the process of making handmade leather sandals, the final step involves fixing the rubber soles onto the sandals. To complete this task, utilize a hole punch to create two holes that match with the pre-existing holes in the leather. Thread a long length of strong cord through both sides of the rubber sole and through the holes in the leather. Tie a tight knot to secure the sole onto the leather. Repeat this process for the other side of the sandal.
Trimming
Now that your leather straps are cut, it’s time to finish them off. Lay the leather strap flat on a cutting board and use an x-acto knife to trim off any excess material.
Round the edges of the leather using sandpaper. Once all edges are rounded, use an edge beveler to finish off the edges. This will give your straps a professional look and prevent them from fraying.
After trimming, you can decorate the straps with whatever design or embellishment you’d like. Punch holes into the leather to thread laces through or add metal rivets for a more industrial look.
Adding Laces
To complete the process of making handmade leather sandals, the next step is to attach the laces. Leather sandals often feature thin lace-up straps that stay in place by wrapping around the wearer’s ankles. You can either use premade laces or cut your own out of leather.
Use a needle and thread to sew them in place, making sure to tighten them as needed for a secure fit. Finally, you can embellish the laces with beads or other decorative elements.
Tips For Making Handmade Leather Sandals
Creating leather sandals by hand is a satisfying and artistic task, however, it requires a certain level of expertise to accomplish successfully. To help you make the perfect pair of leather sandals, here are some tips to keep in mind:
- Choose the right type of leather for your project. When making sandals, it’s important to choose a type of leather that is appropriate for the specific style you are creating, as each type of leather has unique characteristics.
- Measure your feet carefully. You need to get the measurements right for a comfortable fit.
- Cut the leather pieces with sharp scissors or an exacto knife. It’s important to get a clean, precise cut for the best results.
- Use a strong thread to stitch the pieces together. Leather can be tough to stitch, so it’s important to use a strong thread that won’t break or fray easily.
- Use a good leather conditioner to protect the sandals. Leather needs to be nourished and conditioned regularly in order to stay in good condition.
- Choose the right type of sole for your sandals. You can find a variety of soles and straps to choose from, so make sure to pick the right ones for your project. [4]
FAQ
How do you break into leather sandals?
Usually, it is not difficult to break in a pair of handmade leather sandals. All you need is a soft cloth and some dedication to the task. Start by getting your hands wet with warm/hot water and then thoroughly dampening the leather with the cloth. Allow it to sit for several minutes so that the leather can begin to stretch out and soften. Then, gently work the leather in with your hands until it has stretched enough to comfortably fit your foot.
If you’re having any difficulty, try using a shoe horn or something similar to help stretch out tight spots. Finally, take care not to over-stretch the leather as this can cause permanent damage.
What can sandals be made of?
Sandals can be made of a variety of materials, including leather, rubber, synthetic materials, and more! Leather sandals in particular are popular for their comfort, durability and aesthetic appeal.
If you take good care of them, these shoes can give excellent support to your feet and have a long lifespan. If you want distinctive footwear that sets you apart, consider selecting handmade leather sandals. However, making leather sandals requires a bit of skill and dedication.
How do you soften stiff leather sandals?
Leather sandals often are stiff and uncomfortable when. This can be due to the manufacturing process. To soften up leather sandals, it is important to condition them before wearing them.One of the best to do this is by applying a quality leather conditioner or cream. A good leather conditioning product helps to soften and protect the leather from further damage. Rub the conditioner onto the sandals in circular motions using a soft cloth. This will allow for even distribution of the conditioner and help to ensure that the sandals remain soft and flexible.
After conditioning, leave them overnight so that they fully absorb the product. The next day, your sandals should be much softer and more comfortable. To maintain their softness, remember to condition them regularly. You can maintain the excellent condition of your leather sandals for many years by taking good care of them.
What do you need to make leather shoes?
To create a set of leather sandals by hand, you’ll require some fundamental materials. The items you will need include:
- Leather material for the upper and soles of the shoe (preferably full-grain leather)
- Awl for punching holes in leather
- Stitching thread and needles (for stitching pieces together)
- Edge dye or paint to give the finished shoe a polished look
- Protective finish, such as waterproofing spray or sealant
- Clips and laces for fastening the shoes
How did Egyptians make sandals?
Egyptians were considered to be the first people in history to sandals. They crafted theirals using leather and other materials, such as papyrus and reeds. The leather was tanned to preserve it and give it structure, then softened by heating or soaking it in oil until it became malleable. Pieces of leather were then into strips, sewn together linen thread, and decorated with. Sandals were also embellished with jewels or materials such as shells.
Lastly, a sole was attached to the bottom of the sandal for added protection. Contemporary leather sandals that are handmade still take inspiration from Egyptian styles and use comparable materials and tools. With the right materials and a bit of creativity, anyone can make sandals similar to their Egyptian ancestors.
How long does it take to break in leather sandals?
It may take several days to a few weeks to break in a new pair of leather sandals, based on the type of leather and frequency of use. Regular use can make leather a softer and more flexible natural material over time. It’s important to properly condition your leather sandals to help them break in faster. Before you begin wearing your new sandals, use a quality leather conditioner to hydrate and protect the material. Start off by wearing them for brief periods of time and gradually increase the time as they become more comfortable.
How long do leather sandals take to break in?
Leather sandals may take from one to three months before they begin to break in. The method of breaking in the sandals will vary based on the kind of leather used and how frequently they are worn.
Generally speaking, softer and thinner leathers require less time for them to soften and contour to your feet. Thicker and tougher leathers, on the other hand, may take a bit longer to break in.
To speed up the process of breaking in your sandals, wear them for short periods of time around the house or when running errands.
This will help ease your feet into the fit of the sandal and give it time to adjust. You can also apply leather conditioner to help soften and preserve the material. To break in your handmade leather sandals, it is important to have patience.
How do you make a leather break in faster?
Although leather sandals are a classic and comfortable footwear option, they can be uncomfortable when first worn until they are broken in properly. The process could take several days or even weeks depending on the size and thickness of the leather. Fortunately, there are some tricks you can use to make your leather break in faster.
One of the most popular techniques is using a combination of warm water and rubbing alcohol. To clean your sandals, first soak them in the mixture for 30 minutes and then use an old toothbrush to scrub the leather.
Applying this will increase its flexibility and make it easier to shape. Another effective way to speed up the break-in process is with a blow dryer or fan. To make the leather more flexible, put the sandals in front of the dryer and let the heat seep into them. You can also use a damp cloth or wet sponge to pressure any particularly tough spots.
Finally, you can use natural oils like neatsfoot oil, oil, or even olive to lubricate your sandals and make them more comfortable. Apply a few drops to the leather and massage it in to help soften the material.
What material is best for sandals?
Full-grain leather is the best material for making handmade leather sandals. Full grain leather is produced using the outermost layer of the hide, without undergoing any buffing or correction process.
It’s strong, durable and looks great when properly conditioned. Other types of leather such as suede, nubuck and waxed leather can be used but they do not match the strength of full-grain leather.
When selecting your leather, look for a quality hide with minimal blemishes and that has been treated to prevent stretching or shrinking when wet. It’s also important to ensure that the leather has been properly tanned to give it a long-lasting, durable finish.
Once you have your leather, it’s time to cut out the pattern pieces for your sandals and assemble them together. To ensure the longevity and appearance of your sandals, it is important to choose high-quality thread. A waxed nylon or polyester thread is recommended as these materials are strong and will not degrade over time.
What are cheap sandals made of?
Cheap sandals are often made from synthetic materials such as PVC, rubber, and plastic.
These materials may be less expensive to produce, but they don’t last as long or provide the same level of comfort and support that a quality pair of handmade leather sandals can offer. Leather offers excellent breathability and durability while providing cushioning and support for your feet.
Leather sandals are a great choice for any occasion because they are usually more attractive than mass-produced sandals.
Useful Video: Making Handcrafted Sandals | Our Story and How They Are Made
Conclusion
Creating your own handmade leather sandals is a wonderful way to showcase your personal style and craft a one-of-a-kind item. Not only will the finished product be an item that you can enjoy for years to come, but it is also sure to attract compliments from friends and strangers alike.
By following these steps, you can make a beautiful pair of leather sandals in no time. To ensure the best results, make sure to use high-quality leather and hardware, as well as take your time with each step of the process.
With careful planning and attention to detail, you can create a pair of custom sandals that are perfect for any occasion.
References
- https://www.skillshare.com/en/blog/diy-guide-learn-how-to-make-sandals/
- https://www.motherearthnews.com/diy/crafting/make-sandals-zm0z22amzols/
- https://www.instructables.com/Easy-Leather-Sandals-Sun-Sandals/
- http://www.stacefulwiler.com/make-sandals