There are many ways to braid leather around a handle, and in this article we will cover the most popular techniques. This is a great way to add some style and personality to your project, and it’s also a very practical solution if you need to strengthen the handle of a tool or piece of equipment. We’ll walk you through the process step by step, so you can learn how to do it yourself!
Step 1: Prepare the Piece of Leather
The first step in the leatherworking process is to prepare the piece of leather that you are going to use. This includes cutting it to size and shaping it into the desired shape. You should also pay attention to any finishes or treatments that have been applied, such as dyeing or oiling, as these will affect how your leather product turns out. It’s important to make sure that all of the edges are smooth and uniform before starting work on them.
Step 2: Make Loops or Tie a Knot
Once you’ve prepared your piece of leather, it’s time to start braiding. To do this, the most popular method is to make loops or tie a knot in one end of the leather and then use the other end to weave in and out of those loops. This is done with either a loop braid or a knot braid depending on which type of pattern you want. If you are going for a more intricate design, you can add additional loops or knots as needed.
Step 3: Trim Excess Leather Lacing
Once you have all the lacing secured, it’s time to trim off any excess. Using scissors or a utility knife, carefully cut away the extra leather lacing at each end of the moccasin. Be sure to leave enough slack in the lacing so that the edges remain secure and don’t come undone. Once you’ve trimmed your laces, you can use hot glue or fabric glue to seal them off and keep them from fraying. With these steps, your moccasins should now be complete!
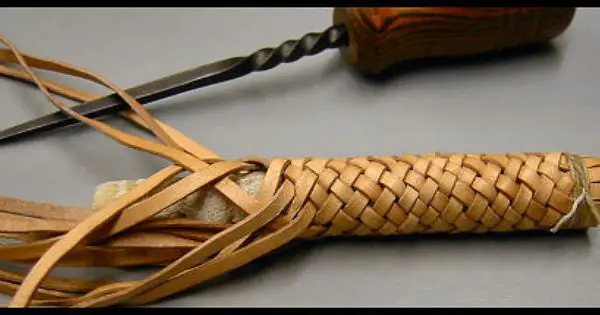
Step 4: Begin Leather Wrapping the Knife Handle
Now that you have completed the leather lacing, it’s time to start wrapping the handle. Start by taking a length of leather lacing and begin looping it around the handle. Make sure to leave enough slack so that the loops are not overly tight or too loose. As you wrap, be sure to keep an eye on the spacing between loops and adjust as needed. Once you reach the end of the handle, secure your lacing with hot glue or fabric glue.
Step 5: Tie a Knot at the bottom of the Leather Wrap
When you’re finished wrapping the handle, it’s time to tie a knot at the bottom. Take one end of the leather lacing and thread it through the loop that is closest to the bottom of the handle.

Then take the other end and thread it through this same loop in the opposite direction. Finally, pull both ends of the lacing tight and tie a knot at the base of the wrap to keep everything secure.
Step 6: Allow the Leather Knife Handle to Dry Naturally
Once the handle is complete and the epoxy has dried, allow it to dry naturally in a cool, dark area. This will help the leather harden into its final shape and provide additional protection against wear and tear. Depending on the size of your project, this could take anywhere from one day to several weeks. Be patient and resist the urge to use it until it’s completely cured! Once finished, you’ll have a custom-made leather knife handle that’s sure to stand out in any collection.
FAQ
What kind of leather is used for knife handles?
Leather that is suitable for knife handles typically has a good balance between firmness and suppleness. Full-grain leathers are the most preferred, as they are the strongest and most durable. However, you can also use top-grain or suede leathers depending on your needs. [2]
Is it that important to leather wrap your knife handle?
Leather wrapping your knife handle can provide a number of benefits. It adds grip, makes the handle more comfortable in your hand, and increases the life of the knife by protecting it from wear and tear. Additionally, it can give the knife a distinct and stylish look. Ultimately, whether or not you choose to leather wrap your knife handle is up to personal preference.
What is stacked leather?
Stacked leather is a type of leather that is made up of several layers of hide glued together. It is often used in knife handles and other items where extra strength and durability are needed. The multiple layers provide additional protection against wear and tear, making it an excellent choice for long-lasting projects. [3]
Useful Video: Braided leather handle wrap on a tomahawk or belt ax
Conclusion
When it comes to braiding leather around a handle, it is important to practice patience and precision. Whether you are creating complex celtic knots or simpler designs like a single four-strand braid, take your time and measure out the proper spacing between strands to ensure that your project turns out beautiful. With this tutorial, you can craft stunning pieces of art that are sure to make an impressive statement. Furthermore, you’ll have created something totally unique in the process – something that brings history into the present day by carrying on traditions thousands of years old. Finally, your work will be incredibly durable and water resistant, so it’s perfect for use as a tool or decoration. So get started – let these techniques serve as a foundation for finding your own creative expressions.
References
- https://diyquickly.com/how-to-braid-leather-around-a-handle/
- https://blog.hdmdknives.com/knife-handle-material.html
- https://forums.azbilliards.com/threads/what-is-a-stacked-leather-wrap.316670/