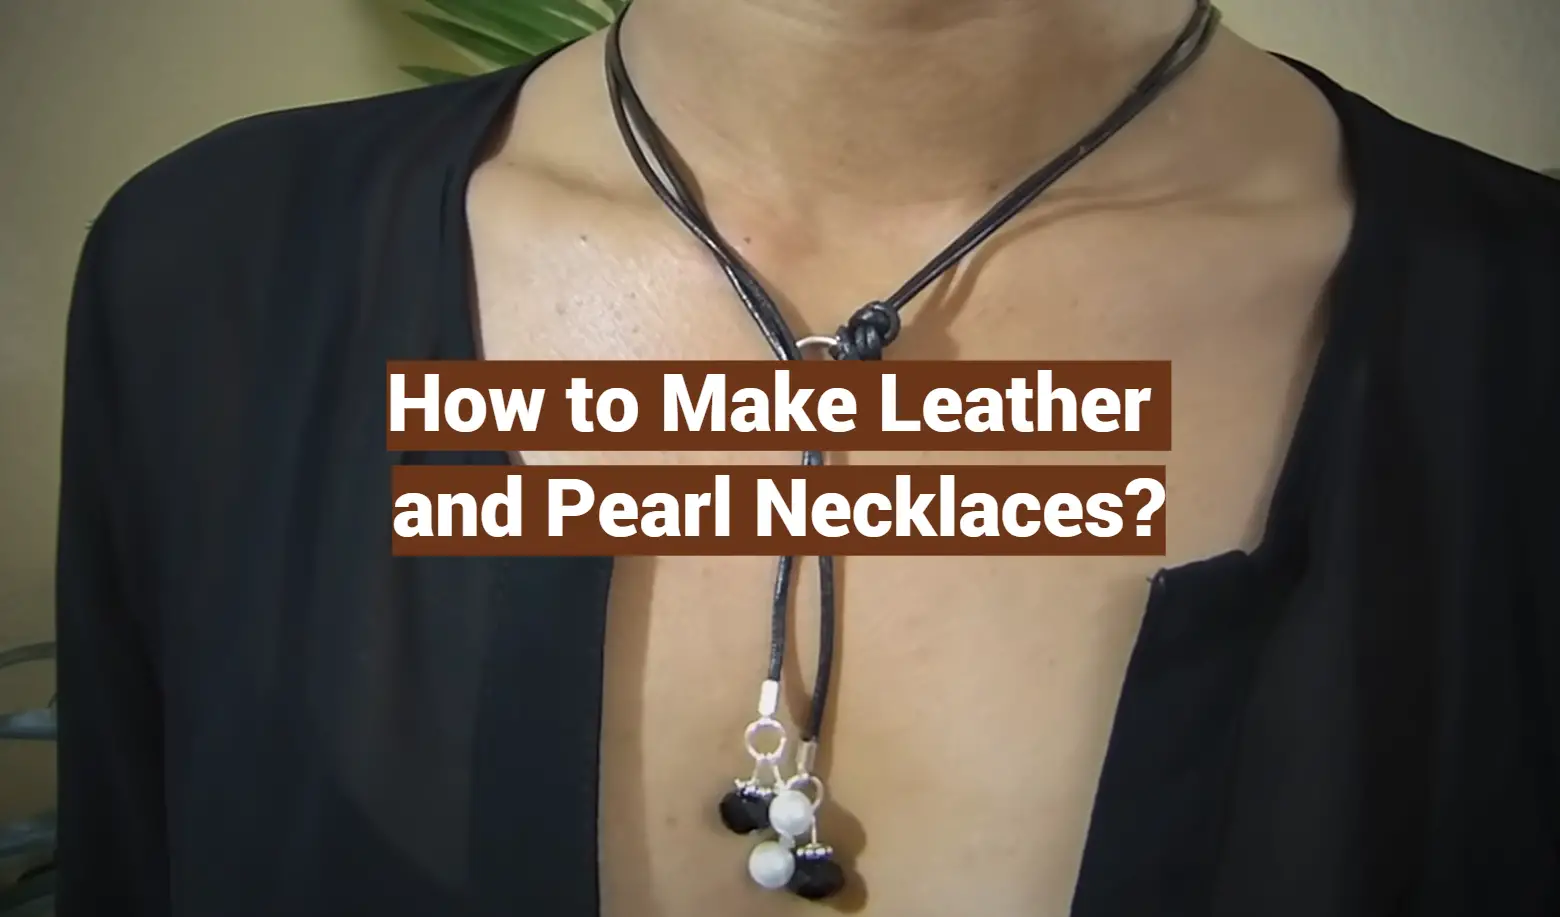
There are many different ways to make a necklace. You can use beads, chains, pearls, and more. In this article, we will specifically focus on how to make leather and pearl necklaces. This is a great project for beginners because it is simple and easy to follow. We will walk you through the steps involved in making this type of necklace so that you can create one yourself!
How to Make Leather Cord Necklace?
Making a leather cord necklace is an easy and fun DIY project that will make you the envy of your friends! Here’s what you need to know before starting:
- Choose a type of leather cord – there are many different styles available in craft stores, so it’s important to choose one that matches your aesthetic;
- Measure the length of your desired necklace – measure at least twice around your neck using a measuring tape or string, then double-check for accuracy;
- Cut the leather cord to size – use scissors or a sharp knife to cut the leather cord to your desired length;
- Attach clasps – place each end of the leather cord into a lobster clasp and secure it with pliers;
- Add charms or beads – you can use any type of charm, bead, or pendant that fits onto the cord. Attach them to the necklace by opening the jump rings (or clipping on the clasp) and then closing them back up once you have added your desired decorations [1];
Soutache leather necklace
The soutache leather necklace is a great way to add an extra dimension to your DIY jewelry design. Soutache is a fine, woven cord typically made out of rayon or silk and used for trimming garments and accessories. To make a soutache leather necklace, you will need:
- Leather cord;
- Pearl beads;
- Glue gun;
- Scissors;
- Needle & thread;
To begin, cut two lengths of the leather cord that will form the base of your necklace. Next, tie one end of each length together so they form one continuous loop. Now it’s time to start weaving! Begin by taking your needle and thread and looping one end of the soutache cord around one side of the leather loop. Pull it tight and secure it with a knot.
Now begin weaving in and out of the sides of the loop, making sure to pull each stitch tight as you go. Once you’ve gone all the way around, tie off your thread at the beginning knot and cut off any excess thread. To add extra interest to your design, glue a few pearl beads onto the front of your necklace using a hot glue gun. Let this dry completely before wearing!
Tassel leather necklace
First, cut the leather cord into two equal lengths. Tie the ends together tightly with a double knot and trim off the excess length. Then if desired, use beads or pearls to decorate one end of the necklace by gluing them onto the leather cord. You can also tie knots between each pearl if desired for an intricate look.
Next, begin creating your tassels by wrapping one side of the cord around a small object such as your finger or a pencil several times. When you have enough wraps, cut off the excess cord and tie it in the middle with a knot to secure the tassel shape. Then do this same step again with the opposite side of the leather cord to create another tassel.
Finally, attach a tassel to each end of your necklace and glue them securely. Your beautiful handmade leather and pearl necklace is now complete! You can wear it on its own or layer it up with other necklaces for an even more stylish look.
Ruffles leather necklace
The last type of leather necklace you can make is a ruffles leather necklace. This type of necklace adds texture and volume for a truly unique look. Here are the materials you need:
- Leather cord;
- Beading thread (in the desired color);
- Jump rings or clasps;
- Jewelry pliers (optional);
Begin by measuring out how much beading thread you need for your desired length. Then, attach the ends of the leather cord together using jump rings or clasps. Next, use jewelry pliers to attach strands of beading thread onto the leather cord in a spiral pattern (you can also use glue if preferred). Finally, pull each strand tight to create small ruffles along the necklace. Now you have created your beautiful ruffled leather necklace!
Some quick tips for people who have never worked with leather before
If this is your first time working with leather, here are some quick tips to get you started:
- Always use sharp scissors or a craft knife when cutting leather. This will help ensure that the pieces fit together correctly and prevent fraying;
- Use clasps and jump rings for fastening the necklace together instead of glue, as the latter may not be strong enough for heavier necklaces;
- Work in small sections and take your time to avoid mistakes;
Making leather jewelry can be both fun and rewarding! With these steps, you should have everything you need to make beautiful leather and pearl necklaces.
How to Make Leather and Pearl Necklaces
Now that you have all of your materials and know the basics, it’s time to learn how to make leather and pearl necklaces.
First, measure out the desired length of your necklace and cut the appropriate amount of leather cord. Attach clasps or jump rings to both ends of the cord so that they are secure. Now you can start adding pearls in whatever pattern you like! You can use jewelry pliers or glue to help secure them onto the cord. Once your design is complete, attach a clasp at one end of the necklace so that it can be opened and closed easily. [2]
Steps
Making leather and pearl necklaces is an easy way to create stylish jewelry. With a few simple tools and supplies, you can make a beautiful piece of jewelry that will last for years. Here are the steps you need to follow to make your own leather and pearl necklace:
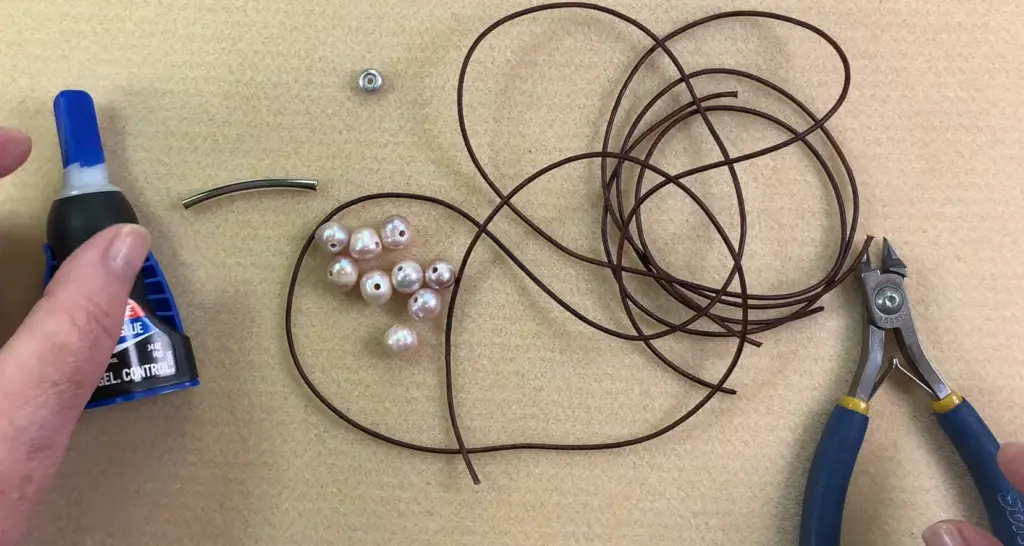
- Gather Supplies – The items you’ll need for making this type of necklace are relatively inexpensive. You’ll need some leather cord (thicker than the regular variety), pearls in the size of your choice, jump rings, clasps, chain nippers or wire cutters, round-nose pliers, scissors, glue, and waxed thread;
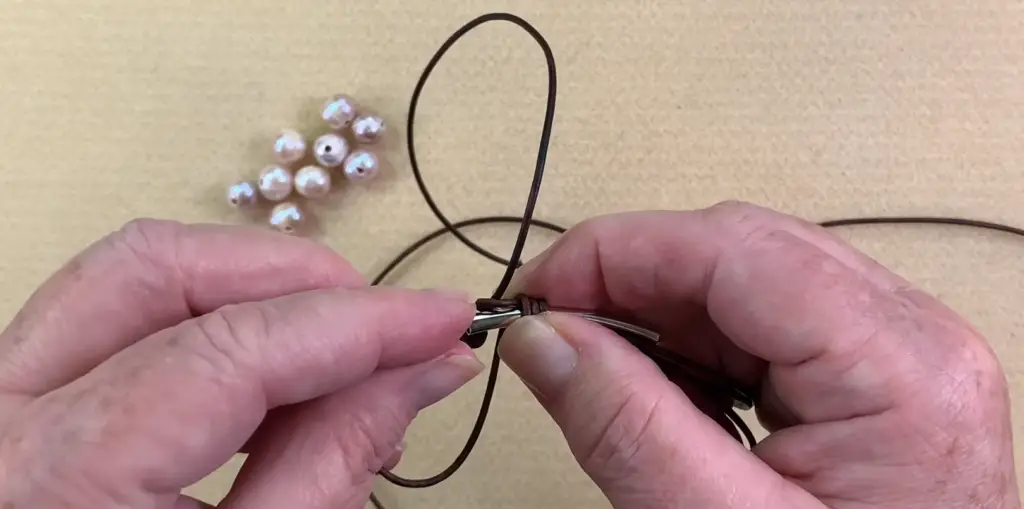
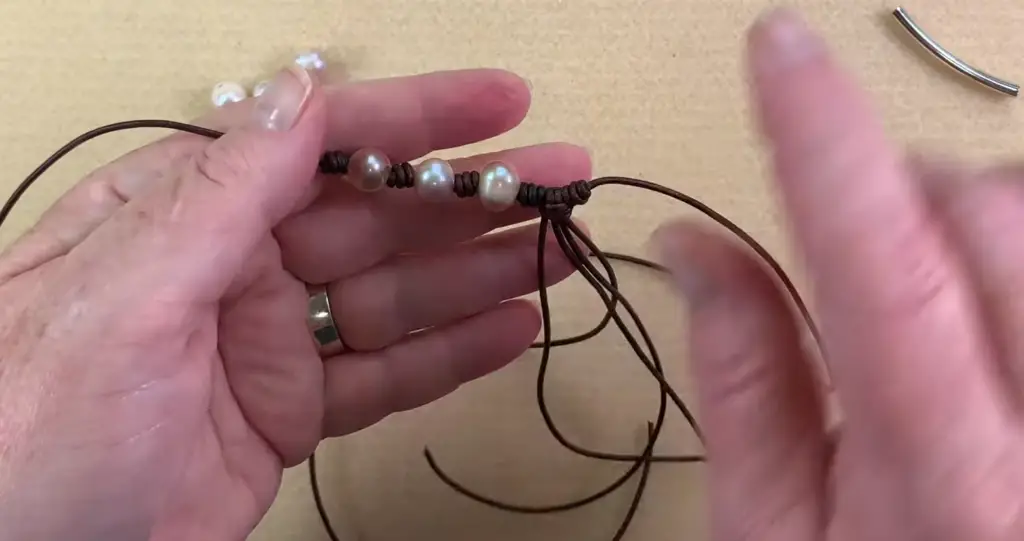
- Cut Leather and String Pearls – First, use the scissors to cut a length of leather cord that is long enough to fit around your neck. Then, thread the pearls onto the cord using waxed thread. Make sure you leave some extra space at either end so that you can attach clasps later on;
- Attach Jump Rings and Clasps – To connect the pearls together and add a clasp for closure, you’ll need jump rings and clasps. Use round-nose pliers to open up a jump ring and place it in between two pearls on your necklace. Then, close the jump ring with pliers again to secure it in place. Similarly, pinch open a clasp, thread the cord through it, and close it shut;
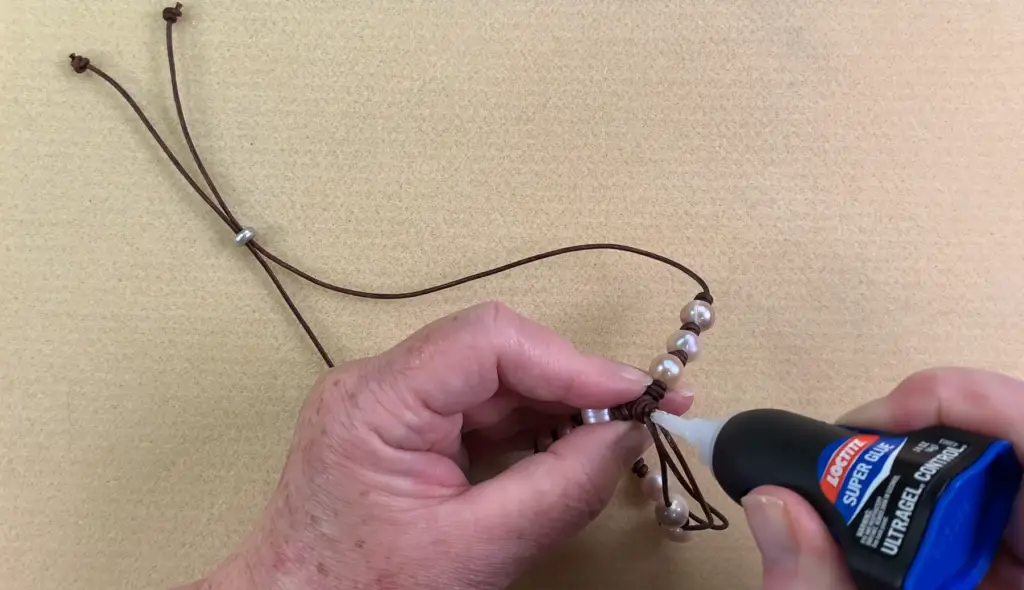
- Secure Thread – To ensure all threads are secure, use a bit of glue or wax to keep them in place. This will prevent the pearls from slipping off the necklace and falling off in the future;
And that’s how you can make your own leather and pearl necklace! If you follow these steps carefully, you should end up with a beautiful piece of jewelry that you can wear for years to come. Enjoy!
Readying the Line for Your Pearl Necklace
Before stringing pearls on your leather necklace, you must secure the line. This can be done with a crimp and thread or a knotting technique.
The knotting technique is more time-consuming but will provide a much sturdier result because it uses multiple knots to secure the beading line. To use this method, tie a knot at one end of the cord and then string pearls onto that end. Leaving some extra slack, tie another knot further down the cord, securing the beads in place. You can continue this process until you reach your desired length or number of pearls.
Once your necklace is secured, you are ready to start adding pearls!
Stringing Your Pearls
When it comes to stringing your pearls, the possibilities are endless. You can go with a classic pearl necklace design or get creative and try something unique. For example, you could alternate between two different sizes of pearls or combine other beads like crystals and stones into the design.
Once you’ve finished designing your necklace, it’s time to enjoy it! Leather and pearl necklaces are beautiful pieces of jewelry that can be worn for any occasion. Whether you plan on wearing yours or giving it as a gift, you can be sure that it will be well-received. Enjoy the process and have fun creating your own unique piece of jewelry!
FAQ
How do you make a pearl leather necklace?
Making a pearl leather necklace is easy with the right supplies. First, gather leather cords or strips of leather, pearls (real or faux), jump rings, clasps, jewelry pliers, and bead stringing wire (optional). Then cut the leather into strips with scissors if needed. String pearls onto one end of the leather strip using either beading wire or a beading needle and thread. Create the necklace’s closure by attaching jump rings to both ends of the leather strip and connecting them with one clasp. If using wire, secure it at both ends with pliers. Finally, trim any excess material if needed and you are all set! Enjoy your handmade necklace!
How do you attach pearls to leather?
Pearls can be attached to leather in a few different ways. The easiest method is to use beading wire or a needle and thread to string the pearls onto the leather cord or strips. If using a needle and thread, tie knots at either end of the piece to secure it. Jewelry pliers can also be used if needed to attach jump rings and clasps for closures. [3]
How do you make a homemade pearl necklace?
Making a homemade pearl necklace is easy and fun. Begin by gathering the necessary supplies—pearl beads (real or faux), leather cord, jump rings, clasps, and jewelry pliers. Cut the leather into strips if needed and then string pearls onto one end of the strip using beading wire or a needle and thread. Create the closure by attaching jump rings to both ends of the leather strip and connecting them with one clasp.
How do you make a necklace with leather cords and beads?
Making a necklace with leather cords and beads is a great way to add an interesting and unique touch to your jewelry. To make your own custom necklace, all you need are some basic jewelry-making supplies such as leather cords, pearls, or other beads and clasps.
To begin, cut the leather cord into the desired length for your necklace. Make sure that it is long enough to go around your neck comfortably with a small amount of slack. Then, decide which kind of clasp you would like to use and attach it to one end of the cord using jump rings.
Next, string beads onto the cord in whatever pattern you’d like. You can use glass or metal beads for this part depending on what look you’re going for. If you are using natural pearls, make sure to use a crimping bead to keep them secure on the cord. Once all of your beads are in place, attach the other end of the cord to the clasp using jump rings.
Finally, inspect your necklace and make sure everything is securely attached. You can also add charms or dangles with jump rings if desired. When you’re done, enjoy wearing your unique and stylish leather and pearl necklace!
Useful Video: Create a Trendy Pearl and Leather Necklace
Conclusion
Thanks for reading! We hope you enjoyed this blog post and found it helpful. If you did, please share it with your friends or anyone else who might be interested. Also, feel free to leave a comment below if you have any questions or suggestions. Thanks again and happy crafting!
References:
- https://jewelrymakingjournal.com/adjustable-sliding-knot-necklace-tutorial
- https://www.pinterest.com/pin/240098223871652320
- https://www.rings-things.com/blog/trio-of-pearls-leather-bracelet-tutorial